Friday, September 10, 2010

Mrs Captains Chewy Blonde Brownies ..mmmmm

These brownies are moist and chewy and have a really nice butterscotch flavor. Its fun to switch up the tidbits added to them as well!  The recipe fills an 8" square pan but I admit to doubling to most often as they go fast!


1/4 cup CABOT No salt added Butter
1 cup Domino Light brown Sugar
1 farm fresh egg
1/2 tsp vanilla extract ( oh yes I make my own and its so good!)
3/4 cup King Arthur Flour
1 tsp baking powder
1/2 tsp salt

Melt butter over low heat on stovetop. Removed from heat and add brown sugar, stir until well blended and cool. Add egg and vanilla and mix well.  Stir in dry ingredients than add 1 cup of mixed goodies, the picture shows a mixture of milk chocolate chips, sliced almonds and Heath Bar Bits.
Bake in a well greased 8 in square pan in a 350 oven for about 25 minutes. Cool in pan.
So good!

Friday, August 13, 2010

Donnas Maple Oatbread

3/4 cup plus 2 tablespoons water (70 to 80 degrees)
1/3 cup maple syrup 
1 tablespoon vegetable oil
1 teaspoon salt
3/4 cup quick-cooking oats
2 1/2 cups bread flour
2 1/4 teaspoons active dry yeast

The recipe was originally for a bread maker but I use my Kitchen aid mixer and it comes out so very good!

1. take 1/2 cup of warm water in a small bowl sprinkle the yeast on top and let set for 15 minutes 

2. add the oats, flour and salt to the bowl mix and then make a well in the center , 
add the dissolved yeast and water to the well . Gently stir incorporating a small about of the flour to make a sticky dough, cover and let set for 20 mintues ( the dough should rise by then )

3.add the remaining 1/4 cup plus 2 tbs water
the maple syrup and oil

mix well , sometimes I find I need to add just a sprinkle more of flour as you just want the dough to be dry enough that you can touch it and form it in a ball with out getting your hands all sticky..ha!

cover and let rise for one hour.

punch down ( I put it back in the mixer) then grease a bread pan , add the dough and let rise again until doubled.

bake at 400 degrees for 30 minutes.

Thursday, August 12, 2010

how green does/will my Garden Grow? Part VI

Yesterday my son in law Kyle came up to help me with the greenhouse again. We got all the rest of the ribs up secured inside and out AND got the Shell on , oh my what a job, it seemed easy enough cut a piece of plastic 20x 25 and pull it over the top. Sure that worked but now how do you keep it from coming off??? We first tried staples but realized after a VERY SHORT while that staples were just going to come out. Even though Kyle was really enjoying using my stapler on the compressor. ( Boys, they just like tools eh?)
Anyhow after much debate we finally came up with securing the bottoms by screwing a row of 2x4's to the bottom which would catch the plastic with the screws but also hold it tight with the 2x4's we worked from 10:30AM til 3:30PM with a short break for lunch!
Wow it was really looking like a greenhouse now! I still wasn't totally sure how I was going to do the ends but I would tackle that tomorrow!


So how would I tackle this tomorrow..hmmm


I felt really good , it was really coming together.


So I slept on it and thing I had an idea about how to put the ends on. Lets see how it turns out.

So the east side had enough plastic over hanging that I just wrapped it over and tacked it down with the plywood I finished it off with on the bottoms since we do get SNOW here in the winter.
I built a door for the west side and I was pretty pleased that indeed it did fit!  I put the hinges on thought hmm maybe I'll be done for the day.

Our dog Bandit found a nice spot in one of the raised beds to keep cool.


One side all done!


Heck the door even works..:) Oh I am happy! I decided to not be fancy with the door latch, I just stuck a 2x4 up on the corner , wanna open it? Just slide the 2x4 up..:) works for me!


I was thinking I was going to be "done for the day" but after I had dinner I thought , hmm its still light out maybe I could get the other door finish if I get started now. So the boys and I went back outside to do some more work.


Oh I was more happy! Yes another door finished , the main construction was finally finished!


Yep that door works too..:)


The humidity was already going up.


Now all that is left to do is make some shelving to start our seedlings on. I need a couple steel barrels, I'm going to fill them with water and surround them with big stones in hopes to help hold the heat in, I also have a compost pile in there between two of the raised beds.  Then I'll line the lower part with plastic inside and top it with with crushed stone. That will be something my husband can help me with I'm sure!  
so I"m done working on it for a few days, My back can use the rest! Tomorrow I need to weed the gardens, make some pickles and mow the lawn!

Tuesday, August 10, 2010

how green does/will my Garden Grow? Part V

Well.....I have discovered that building a 12x18' building (greenhouse) is a bit harder than I planned seeing as though I really didn't have plans other than a drawing. Harder still seeing as though the spot I put it is sloped not only north /south but also east /west.  But I am happily gaining ground and so glad I am using 3" screws since not only do I think it will be stronger but next year if I want to change some of the inside support structure it will be so much easier to "rip it out" .

So my daughter and her husband came up on Sunday and they helped me cut all 40- 4" strips of plywood and we got all the North side strips up, what a big job!


Today I put up the last two horizontal supports - the ones I was working on when I kept dropping everything on my head!
They are up and everything is level so I'm happy!  Now its ready to put up the south facing ribs!


Meanwhile we've got so many tomatoes! The ones in the greenhouse have been taking a beating with me dropping things on them but still they are loaded!
We'll be canning tomatoes like crazy soon!


I'm thinking when I'm done doing this I could build a barn..ha!
Here you can see all the plywood strips that Kyle cut up for me, what a great help!  They are screwed on together but one is above the side support and one is below it.


The back side will have plywood on the bottom edge , this side will have plastic but in the winter I'll put plywood up over the top of it to protect it from the drifting snow.


So tomorrow we'll get the rest of the "ribs" up and I'll get the plywood on the back and ends I hope , then I need to make a door for the west side and a window that will open on the East side. Still lots to do but by then end of tomorrow I should be able to put the plastic over the top!


By Request - Mrs Captains Flat Bread (Pizza)

I started a search for homemade flatbread after visiting "American Flatbread" in Burlington , Vermont.  They have the best flatbread I've ever tasted and there I learned to NOT call it Pizza..ha! The crust is just what they call it flat and its crisp. So going along with my make it myself mode  this is how I make it.

Take 2 Tablespoons of yeast and mix with 2 teaspoons of sugar. Add 1 cup of warm water, stir and let that sit for about 5 minutes, this should give you a nice foaming mixture. Add 3 tablespoons of olive oil.

In another bowl add 2 1/2 cups of flour and 2 teaspoons of salt add the yeast mixture to this ( I use my kitchen aide mixer with dough hook for this ) kneading the dough until I have a nice consistency. You may need to add more flour this is critical you need a soft dough that is smooth and elastic but not tough. I sometimes add a much as 1/4 cup more of flour during this kneading process.

Since I like my flatbreads to fix on my pizza stone I cut this dough in half  each half will make a small 12" flatbread.  take each half  and form into a ball by kneading in at the edges. Place on a pan which has been coated with olive oil and let the dough rest for about 20 minutes , you don't need to cover it.

After it has rested form it into a 12" round which is no more than 1/4" thick. Now I know that using a pizza stone your supposed to heat it first but I don't have one of those neat big wooden things to transfer it so I just dust the stone with cornmeal and place the dough on the cold stone.   add your toppings and bake for about 15 minutes.

Now toppings on a flatbread , less is better, you want the crust to be crispy and not soggy.
The photo I took of my flatbread is just asiago cheese with italian herbs, sundried tomatoes and pineapple.  no sauce.. I love it!

if you add sauce just use it sparely! Enjoy!

Saturday, August 7, 2010

Its Pickle Time!


Okay , so my Greenhouse has taken a break since the last time I worked on it I dropped way to many things on my head.  I took a break and built a new center island in our kitchen....

Its not totally done yet, I still need to add a layer of cement board, some wood trim and some neat ceramic tile on top.  Then put a few coats of poly coat on the wood.  No, I haven't forgotten about the greenhouse but have to admit I got a bit discouraged, or frustrated the last time out there.  Hopefully Sunday I'll take another crack at it.
Meanwhile the vegetable garden is doing well, I've put up beets, peas and beans into our freezer and now the cukes are coming fast and furious. I do love eating them but the majority of them are going into pickles.  PICKLES...mmmmm 

This is how I go about doing ours....
Onions, Cukes and Sweet Red Peppers.
First you gotta go out in your garden and gather up some nice cukes long and slender.  I am also lucky enough to have some nice onions growing too, but admit to having to buy the red peppers.

Before I do anything I fill the canning pot with water and start it going. It might start boiling before I'm ready, if so I just turn it off or turn it down depending on how much longer before I'm ready for it. Course from now until the cukes are done I'll leave the canner on the stove full so it won't take long to warm up , plus I'm not wasting water refilling it. 

wash those veggies
Wash all the veggies really well, nothing worse then dirt in your pickles!


Nice clean veggies

After you've got them cleaned up slice them all up no thicker than about 1/4" I usually cut up about 3 cukes, then layer some sliced Onion and Peppers then sprinkle about  some pickling salt on top, then another 3 cukes , onions and peppers and more salt using about 1/3 cup for that quantity.


After you got the amount of veggies cut up you need then you need to cover the bowl with Ice.

Leave the ice on there for about an hour and a half. ( this is a good time to make a few loaves of Butter Honey Bread !)


Now you need to rinse the veggies off, drain them and rinse them again.
In a big pot on your stove, put 2 cups of sugar, 1 cup of vinegar and 1 tablespoon celery seeds. ( lots of time I double this to be sure I'll have enough if I cut up extra cukes) boil the mixture and once its boiling good, add the veggies and bring to another boil. While your waiting get your jars ready.

Its always nice to have a kitchen buddy with you while your cooking. Even if your buddy is just sleeping on a dish towel. :)


Wash your jars in hot hot water or if you prefer heat them in the oven at 250 for about 15 minutes. I usually wash mine and leave the lids and covers in the hot water until the jars are filled.  Fill the jars full with the pickle, onions and peppers then topping off with the liquid til 1/4 inch from the top, slide your spoon or knife around in the jar to remove air bubbles top off the jars with the lids and cover, usually I have a towel in my hand since the jars are quite hot now and it helps to be able to tighten the covers.

After all the jars are filled put them in the boiling water canner and process for 10 minutes.

Be careful  when removing the jars. You'll want to use some good rubber coated tongs. While the jars are cooling you should hear the "pop" of the lids and before storing the jars away push the top of the lids and be sure all have a good seal. You should be able to remove the cover and give the lid a gentle pull and it not come off.
Store jars in a dark place. They won't last long though these pickes are awesome!


The pickes I just made are on the left.  I like the bright clear brine for these versus the bread and butter pickles to the right that have some different spices which makes the brine more a yellow color. Both are good but I really like these tasty ones better, crunchy and sweet! 
Go make some pickles! :)


Monday, July 26, 2010

How green does/will my Garden Grow? Part IV

I'm starting to think this is going to be a bigger project than I first anticipated! The "plans" I found were for an 8x12 green house and I turned it into a 12x18  greenhouse. Now I am not a builder but I do like to build. I think because of this some of the things I've done well, it reminds me of when I sew something, I like to sew but I am not a seamstress like my Mom was she taught me really well but when I sew sometimes I need to rip things out and do them again. So now of the things I've been building I need to rip out too, thing is its not so easy to rip out boards! Luckily for this project I have been using nice long wood screws so its easy to back um out if I need to!
  My daughter and son in law came over tonight to have dinner we had one of her favorites tonight "Jack Daniels Salmon" with wild rice and fresh beans from the garden. Then they went out to help me with the greenhouse! I was so happy I didn't need to cut that 30 degree angle on the `12 foot 2x6's...:)  Course once they were cut I realized that the doors I made were wider than the angle of the board allowed plus it was going to make the top too flat so we decided to raise the ridge board up higher to make the angle steeper.  So we raised it up about 4 1/2 inches and I think now once I tack on the 1x6  to the ridge board I should be all set to start adding the 1/4 plywood ribs.
Now there is one small problem which is why I'm glad I used screws, the 2nd doorway from the left I didn't measure it right, the door is the right size alright but it sits 2 inches further over then the others ...ugh so tomorrow I will go unscrew it and recut the support boards and hitch it back up again...ripping out..I hate ripping out...but I want it to be right so I will add another day on to this job because of my mistake.  I think for fun I will tack on the 1 x6 to the ridge board though and then hitch on a  couple ribs just to be sure they are going to work!
I'm getting closer to having a greenhouse...:)

Sunday, July 25, 2010

How green does/will my Garden Grow? Part III

Whew this is a LOT of work! When I saw the design I was going to make I thought , "easy , Peasy!" Okay so not quite as easy as I thought but I'm getting there.
I sent my photos to my brother in Myrtle Beach who is an excellent carpenter. He said "It looks good but don't be sad if this winter you get a big snow storm and it blows over or caves in" Hmmmm that didn't give me a ton of confidence although I knew that there is danger of the plastic ripping apart in the winter but I really didn't want my construction to fall in after all this.  So far the materials were $400.00 not bad for a greenhouse but still don't want to have to do it again in the spring.  Plus as of now its taken about 4 days and I can see I probably have another 4 to go.

  After his suggestion that I double up the 2x6 ridgepole I told him I was going to put up there on top, I decided that I was going to double up on all the supports and add one more right at the 12' mark where I would be having to join the board since I got 12 ' stock.

   I'd say after 4 hours I had all four "doorways" sturdied up and all ready to put up the ridgepole.


so tomorrow or maybe the next day :) I will start cutting the 30 degree angle on the ridgepole after I figure out how I want to do that...I guess its the handy dandy table saw that I hate using !  Hopefully next time I post something here I will still be able to type because I'll still have all my fingers!  Tally Ho and away!

Friday, July 23, 2010

How Green does/will my Garden Grow? Part II

 So yesterday I went out early to get a jump start on the day ahead working on our new greenhouse.  I studied it carefully to be sure my days work yesterday was met with no errors that I couldn't live with.  I needed to finish the baseboards and put up the support on the east side so I could start attaching the center beam.


So after a days work this is what I came up with, I used my carpenters string to be sure everything was level.  I knew once I put up that center beam if its not level I'm  stuck!
the far left corner vertical support was too short so I had to replace it and will cut them all off with the reciprocating saw today.  I also will be adding 3 more vertical supports on both long sides to hold the ribs of the greenhouse. I've decided I'm only going to make one door though but make the opening at the far end a window with which I can put a screen in for the "summer when the weather is hot" .

I also decided that it was alot of rocks I was going to have to use to fill in that gap on the bottom from the slope so put another piece of 2x8 down there, I should of stained that piece first but I'll do that later , I am going to add wood to the back doing the same thing.  Then I'll back fill it with crushed stones.


Now this is my whole reason for doing this, yep we are way up in Northern Vermont where spring comes late and winter comes early. Its almost August and the cukes are just barely looking like cukes! :)

And the tomatoes have a little ways to go too!


a few shots below of some things around the gardens


Now I must get back to work!  Thanks for visiting!  More work to be done on this green house I'm planting some experimental crops in it now!


Tuesday, July 20, 2010

How Green does/will my Garden Grow?

     Living in Northern ( Almost in Quebec, Canada) Vermont, where I see just as many Quebec License plates as Vermont ones. The growing season she is short. When we bought the house up here on the mountain my daughter in law joked that since we are living on the North Face of the peak that we'd never see the sun.  Well we do see it but I admit to it being slow to come and fast to go.  But regardless both my Husband and I love to garden so it wasn't long before I started ...
 first with a few flower beds with natural stones surrounding them but then I kept looking at the grass.....
One day when my Husband had returned from his ship for a months holiday I said "Honey, why do we want to spend our time mowing that grass out front?" So it wasn't long before the tractor was digging it up!


wha la a garden has emerged !

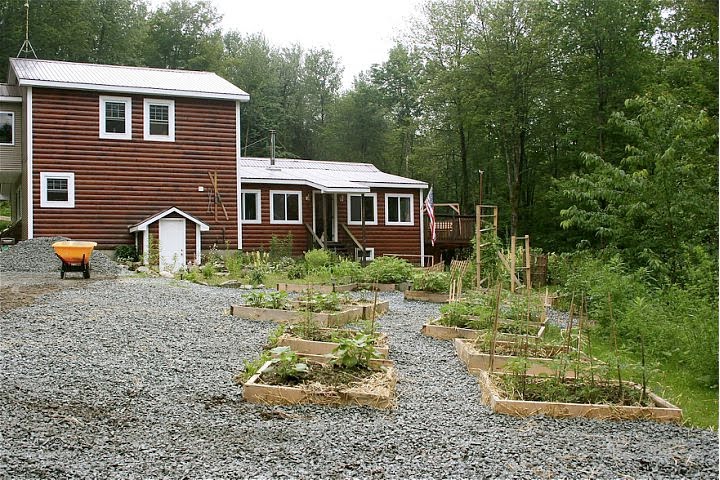
We started with this center garden filling it with a few annuals , hostas and started "collecting" perennials  which we had around the property.  I built a few raised beds for more flowers and started some vegetables.  It wasn't long before I realized I really wanted a bigger vegetable garden though so...


This year we added 12 more 4x4 raised beds filling them with squash, cukes, peas, onions, carrots, beans, herbs, potatoes, corn and LOTS of tomatoes since we want to make our own pasta sauces and soups.

Now came the reason for this ... the plants are late, we don't get enough sun in the house to start seedlings until way late in the spring, I made a few make shift greenhouses this spring but they met with disaster after we had a 2' snow fall in April. I needed a more permanent solution and started scanning the web for small green house designs.  Finally finding one that I thought would fill our needs in an old gardening book I've had for years!

So I drew up the design and calculated how much wood I would need to complete the project and ordered the wood.

Now keep in mind some of this wood is for a couple more projects I am working on maybe I'l blog about that after I finish this one! ha!
The greenhouse base is 2x8 pressure treated wood so I hauled the 5 pieces I was going to need to start over to the "site".


Yes I was going to need to cut one board as the dimensions of the base will be 12x18.
I decided before I got the saw out I'd see how level things were.


Level? Well I guess I should of expected this since we do live on the side of a mountain. So I go and get the spade and think I'm really happy my Husband didn't use up all the crushed stone as I was going to need it to grade the base.


I finally got it close enough that I was going to have to dig the front down 4 inches and build up the back about 6 inches to get a level grade , now I wish the stones we not already around these beds as I'm going to have to rake them out so I can dig out the front.


Day two: I got distracted chasing a butterfly, wish I had my long lens on my camera though.!


So I finally got the level done and 3 sides squared up and I started filling in the ditch I dug with crushed stones we had ordered for the basement and used the extra around the gardens.


The East side of the greenhouse for sure sits higher up , our ground is really sloped here.
I'm going to get big rocks to put around the edges and fill it with crushed stones...or maybe get another piece of pressure treated wood to help fill the gap...still deciding on that one.


Done for the day since I needed to cut more 2 x8's the front I'm still debating if I should put plexiglass on the straight sides to protect it from the high drifts of snow we get...the back sits high enough already I think...


I think I've decided to just get alot of rocks to fill this, since they are free on the property..and I have the crushed stone for the inside.  It will just mean a few trips in the woods to find them!


I took  a walk inside the greenhouse to get  a feel for it. There are 4 raised beds  and I've already started my compost pile to help keep the heat in in the fall and spring.  I want to find a couple big metal barrels to put water in. , Right now there are tomatoes, Squash and cukes growing in here.:)


standing in the other side of the greenhouse I am standing where I will build shelving to hold trays of seedlings..:)


So thats it for today. Next I will continue adding the 2x8s' around the edges and add the 3' supports , doors will be at both ends so that will be next.


Stay tuned!